
How To Start Teaching Music Lessons: A Complete Checklist for New Music Teachers
Starting to teach music lessons is an exciting step—whether you’re hoping to build a small studio from home, teach online, or grow a full teaching business. If you love music and enjoy helping others learn, teaching lessons can be a rewarding and flexible way to share your skills.
This guide walks you through the essential steps to begin teaching music lessons with confidence, clarity, and a strong foundation that supports both you and your students.
Understanding Your Teaching Focus
Before you begin, take time to define what you want your teaching to look like. This helps you stay focused and attract the right students.
Think about:
The instrument(s) you want to teach. Have a primary and a secondary to help fill out your studio if you can. (I teach French horn as my primary instrument and use piano to fill out my studio.)
The ages or levels you enjoy working with.
Whether you prefer in‑person lessons, online lessons, or a mix
The teaching style or philosophy you want to bring into your studio
Having a clear direction makes every next step easier.
Setting Up Your Teaching Space
Your teaching space doesn’t need to be fancy—it just needs to be functional, comfortable, and welcoming.
A good lesson space includes:
A quiet room free from distractions (I’ve raised 3 kids while teaching any my space is not always quiet but it’s preferred)
Adequate lighting, or stand lights (have 2, one for use during the lesson and one charging)
A music stand, pencils, and basic supplies
A comfortable place for students to wait (and parents, if needed)
For online lessons: a stable internet connection, camera, and microphone
A well‑prepared space helps students feel at ease and ready to learn.
Creating Your Studio Policies
Clear studio policies protect your time, set expectations, and help families understand how your studio works.
Your policies should cover:
Tuition and payment schedule
Attendance and cancellations
Makeup lessons
Communication guidelines
Studio calendar and holidays
These policies become the backbone of your studio and help everything run smoothly.
Done for you
Don't want to write your policy from scratch?
The Basic Music Studio Policy Template is a fully written, fully customizable contract you can hand to your first family on day one. It covers everything above — tuition, cancellations, makeups, communication, and holidays — plus a 17-minute tutorial video that walks you through every section.
Get the done-for-you policy template →One-time · $125 · Instant access · Works in Word and Mac Pages
Deciding on Your Rates
Setting your rates is an important step in establishing your studio. Consider your experience, local pricing, and the value you bring to your students.
Decide on:
Lesson lengths (30, 45, or 60 minutes)
Monthly or weekly billing
Whether you’ll charge registration or materials fees
Once you choose your rates, keep them consistent and communicate them clearly.
Creating a Simple Website
A website helps families learn about your studio, understand what you offer, and contact you easily. It doesn’t need to be complicated—just clear and welcoming.
Include:
A homepage that introduces your studio
An About page that shares your story
A Lessons page that explains what you teach
A FAQ page for common questions
A contact form
Your website becomes the central place where families can learn about you and take the next step.
Preparing Your Teaching Materials
Before your first lessons, gather the materials you’ll use regularly.
This may include:
Method books
Technique warm‑ups
Theory worksheets
Practice charts
Assignment sheets
A welcome packet for new students
Having these ready helps you start strong and stay organized.
Creating a Smooth Onboarding Process
A warm, clear onboarding experience helps new students feel supported from the very beginning.
Prepare:
A welcome email
A studio handbook
A student information form
A first‑lesson checklist
A simple way for families to ask questions
This sets the tone for a positive, long‑term relationship.
Getting Ready for Your First Lessons
Your first lessons are all about connection, clarity, and setting expectations.
During the first lesson:
Greet students warmly
Learn about their goals
Assess their musical background
Introduce your teaching style
Assign simple, achievable goals for the week
Follow up afterward with encouragement
These early moments build trust and excitement.
Building Systems That Support You
As your studio grows, systems help you stay organized and consistent.
Consider routines for:
Lesson planning
Billing
Communication
Recital planning
Ongoing professional development
Ready to go deeper?
Want the complete system I used to build two thriving studios?
My Getting Started Online Course walks you through every step — pricing, branding, marketing, student retention, and more. Over 2.5 hours of video content built specifically for new studio owners who want to do this right from day one.
See the Getting Started course →Part 1 of the Complete Studio Strategies Course · $500
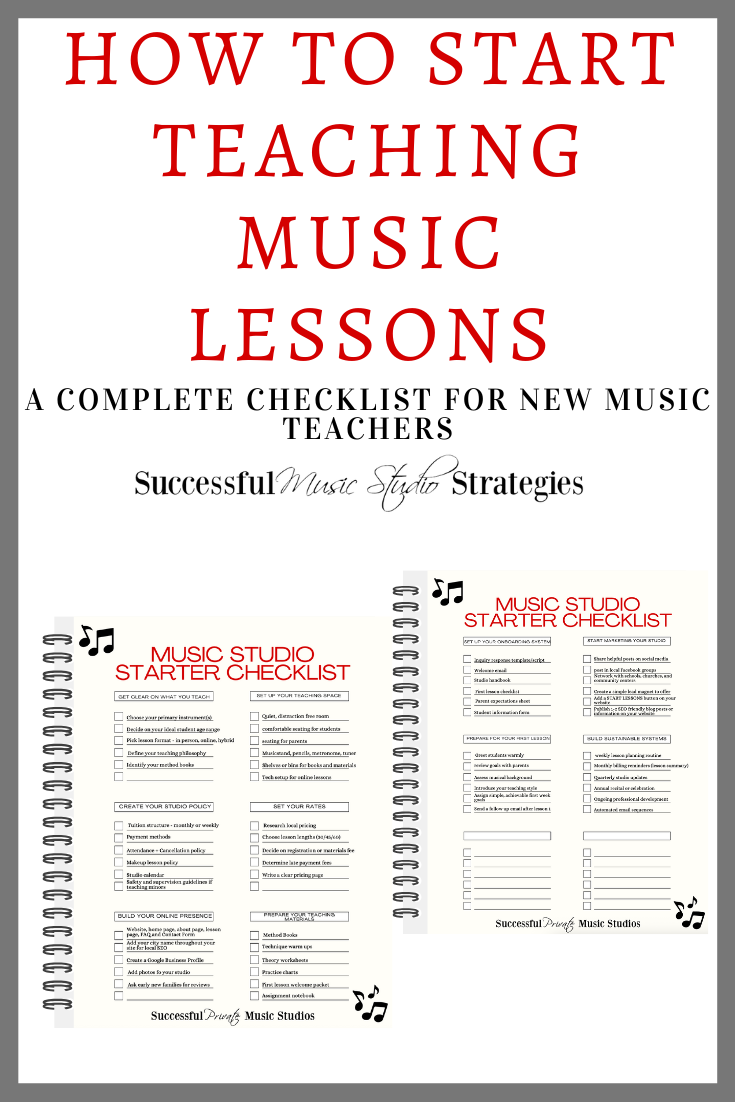
Free Download: Music Studio Starter Checklist
To make your journey even easier, download the Music Studio Starter Checklist—a simple, step‑by‑step guide that walks you through everything you need to launch your teaching studio with confidence.
It includes:
Teaching focus
Space setup
Policies
Rates
Website essentials
Teaching materials
Onboarding
First‑lesson prep
Marketing basics
Sustainable systems
It’s the perfect companion as you begin teaching music lessons.
Happy Teaching!
Becky
What do you want to tackle next?
You've got the overview — here are the best next steps depending on where you are right now.